I’ve recently spent some time in various code bases working on Windows RDP related discovery. This post is going to talk about using a new Nmap script, rdp-ntlm-info.nse, against RDP services to discover the target’s hostname, domain name, DNS name, and version.
3389/tcp open     ms-wbt-server Microsoft Terminal Services
| rdp-ntlm-info:
|   Target_Name: W2016
|   NetBIOS_Domain_Name: W2016
|   NetBIOS_Computer_Name: W16GA-SRV01
|   DNS_Domain_Name: W2016.lab
|   DNS_Computer_Name: W16GA-SRV01.W2016.lab
|   DNS_Tree_Name: W2016.lab
|   Product_Version: 10.0.14393
|_  System_Time: 2019-06-13T10:38:35+00:00
This post was updated 2019.06.14 to reflect that the script had been committed to the official repo, update the usage instructions to reflect this, and include the NSEDoc link for the script.
This post was updated 2019.06.18 to indicate that users of 7.70 need updated nselib/datetime.lua as well.
Before you get started
The new script has been committed to the Nmap SVN repository which is also mirrored in GitHub. Until a new version of Nmap is released you will have two options for using the script.
The first option is to just copy the script into your existing Nmap installation. For the best results you will need a modern version of Nmap. I recommend the latest version which is 7.70 released in March 2018. The easiest way to get the required files is likely downloading them from GitHub.
- Copy rdp-ntlm-info.nse to the scripts directory of your Nmap installation.
- Copy rdp.lua to the nselib directory of your Nmap installation.
- Copy datetime.lua to the nselib directory of your Nmap installation.
The second option is to build from GitHub or the authoritative Subversion repo [3]. This takes a bit more work but you also end up with the other new features and bug fixes that have happened since the last release.
Basic Usage
This script is actually pretty straightforward as it doesn’t require any additional arguments. You can see information about the script’s usage in NSEDoc.
sudo nmap -p 3389 --script rdp-ntlm-info target_ip
3389/tcp open  ms-wbt-server
| rdp-ntlm-info:
|   Target_Name: W19GA-SRV01
|   NetBIOS_Domain_Name: W19GA-SRV01
|   NetBIOS_Computer_Name: W19GA-SRV01
|   DNS_Domain_Name: W19GA-SRV01
|   DNS_Computer_Name: W19GA-SRV01
|   Product_Version: 10.0.17763
|_  System_Time: 2019-06-13T11:20:33+00:00
It is important to note that no authentication is required to gather this information and no login attempts were made.
For consistency’s sake I’ve kept the output in the same format as the other *-ntlm-info scripts which were written by Justin Cacak. I’ve also used his naming scheme instead of calling the script rdp-credssp-info or rdp-nla-info. This allows you to gather information on a target by running this family of scripts at the same time by using the Nmap argument –script *-ntlm-info.
You can find out more about these other scripts by looking them up on Nmap’s NSEDoc page.
In the example below I’m running them all against a rather poorly configured Windows 2008 Service Pack 2 server in my lab.
sudo nmap -sSC --script=*-ntlm-info -p 23,25,80,3389 target_ip
PORT     STATE SERVICE
23/tcp   open  telnet
| telnet-ntlm-info:
|   Target_Name: W008GA-DC01
|   NetBIOS_Domain_Name: W008GA-DC01
|   NetBIOS_Computer_Name: W008GA-DC01
|   DNS_Domain_Name: W008GA-DC01.difflab.lab
|   DNS_Computer_Name: W008GA-DC01.difflab.lab
|_  Product_Version: 6.0.6002
25/tcp   open  smtp
| smtp-ntlm-info:
|   Target_Name: W008GA-DC01
|   NetBIOS_Domain_Name: W008GA-DC01
|   NetBIOS_Computer_Name: W008GA-DC01
|   DNS_Domain_Name: W008GA-DC01.difflab.lab
|   DNS_Computer_Name: W008GA-DC01.difflab.lab
|_  Product_Version: 6.0.6002
80/tcp   open  http
| http-ntlm-info:
|   Target_Name: W008GA-DC01
|   NetBIOS_Domain_Name: W008GA-DC01
|   NetBIOS_Computer_Name: W008GA-DC01
|   DNS_Domain_Name: W008GA-DC01.difflab.lab
|   DNS_Computer_Name: W008GA-DC01.difflab.lab
|_  Product_Version: 6.0.6002
3389/tcp open  ms-wbt-server
| rdp-ntlm-info:
|   Target_Name: W008GA-DC01
|   NetBIOS_Domain_Name: W008GA-DC01
|   NetBIOS_Computer_Name: W008GA-DC01
|   DNS_Domain_Name: W008GA-DC01.difflab.lab
|   DNS_Computer_Name: W008GA-DC01.difflab.lab
|   Product_Version: 6.0.6002
|_  System_Time: 2019-06-13T11:50:50+00:00
You would get additional useful information by turning on service version detection using -sV.
Bonus Info: Windows 2008 configuration quirk
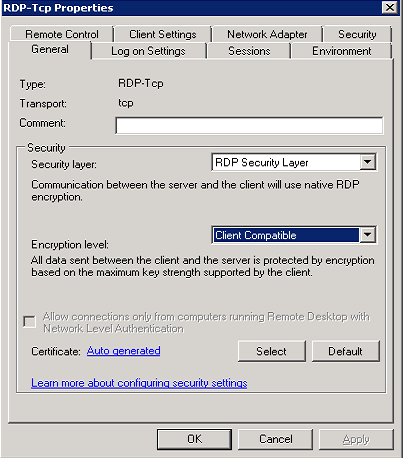
While testing this I discovered an interesting fact. Windows 2008 will negotiate TLS and CredSSP authentication even when explicitly configured to use the Standard RDP Security Layer. The server in the scan output above has this RDP configuration:

While it’s generally beneficial to be able to negotiate more secure authentication protocols this behavior was certainly unexpected.
Bonus Info: Using NTLM to fingerprint Microsoft Exchange
There are a variety of Windows services that support NTLM authentication but, fortunately for defenders, the services generally have NTLM disabled by default (IIS, FTP), have been deprecated in recent versions (TELNET), or should be less frequently exposed to the Internet (Microsoft SQL).
An exception to this is Microsoft Exchange. Exchange is tightly integrated with Active Directory and so is often configured to allow Windows Authentication (NTLM) with it’s various services. Since many of these are intended for use across the public Internet it makes for a useful target.
The Nmap command to do this is similar to the one above but with a couple of changes. First we’re going to add in the TLS wrapped ports for SMTP (587/tcp) and IMAP (993/tcp). You could also add POP3 (995/tcp)
We’re also going to add HTTPS (443/tcp) and tell the http-ntlm-info script to use the path for Exchange Web Services (EWS). EWS generally requires Windows Authentication and so should provide useful information.
sudo nmap -sSCV --script=*-ntlm-info --script-args http-ntlm-info.root=/ews/ -p 443,587,993 owa.viccorp.com
PORT    STATE SERVICE  VERSION
443/tcp open  https Microsoft IIS
| http-ntlm-info:
|   Target_Name: VICCORP
|   NetBIOS_Domain_Name: VICCORP
|   NetBIOS_Computer_Name: LAXDC000-CAS02
|   DNS_Domain_Name: viccorp.com
|   DNS_Computer_Name: LAXDC000-CAS02.viccorp.com
|   DNS_Tree_Name: viccorp.com
|_  Product_Version: 6.3.9600
587/tcp open  smtp     Microsoft Exchange smtpd
| smtp-ntlm-info:
|   Target_Name: VICCORP
|   NetBIOS_Domain_Name: VICCORP
|   NetBIOS_Computer_Name: LAXDC000-CAS02
|   DNS_Domain_Name: viccorp.com
|   DNS_Computer_Name: LAXDC000-CAS02.viccorp.com
|   DNS_Tree_Name: viccorp.com
|_  Product_Version: 6.3.9600
993/tcp open  ssl/imap Microsoft Exchange 2007-2010 imapd
| imap-ntlm-info:
|   Target_Name: VICCORP
|   NetBIOS_Domain_Name: VICCORP
|   NetBIOS_Computer_Name: LAXDC000-CAS02
|   DNS_Domain_Name: viccorp.com
|   DNS_Computer_Name: LAXDC000-CAS02.viccorp.com
|   DNS_Tree_Name: viccorp.com
|_  Product_Version: 6.3.9600
Now we know some useful information about the host and Active Directory environment. It’s always interesting to be able to get the OS version information from a remote service. In this case 6.3.9600 = Windows Server 2012 R2.
Hopefully you will find this information useful. Please don’t hesitate to reach out to me if something isn’t clear.
Good luck!
– Tom Sellers ( @TomSellers )
References: